Sunday, February 27, 2022

Hawaiian Buns - 3 rises recipe

 I have used this recipe from KingArthurBaking.com I have used the blog posted on that site that has more detailed instructions but for the forming and rise I have followed this YouTube video and I got very good results. The Buns were really good and raised well. You need a lot of patience to let the dough rise properly since all the sweetness slow the rise. You can see the results were amazing though. 

I did rise the dough 3 times and followed some of the directions from this video from Savor Easy youtube channel. I did not use that recipe though do I can not tell you what happens if you do follow the same recipe, sorry. 

I made 2 batches, the first one I have replaced the Potato Flour by regular flour and used only unbleached sugar but no brown sugar. The results were quite good. For the second batch I have used brown sugar (1/3 of the total sugar amount) and used a mashed potato mix to in place of the potato flour. The results were even better, I assume because of the potato flour.   

Next time I want to try, other type of rolls like this Hokkaido Milk Bun or this Hawaiian Bun recipe using a technic called yu-dane (Japanese: 湯種, romanized: yu-dane) like here on this Shokupan recipe from ChopSticksChronicles site. (Thank you Shikoko-san!) The technic was used to create a similar technic called tangzhong (Chinese: 湯種; pinyin: tāngzhǒng) or Tangzhong Method (also called water roux, tang zhong or just tangzhong) I just want to try and see if it makes a big difference. 

First Batch:

Second Batch: 


Ingredients (for 15 buns of around 55grams each)

Sponge

Dough

Instructions

  • For the sponge: Weigh your flour; or measure it by gently spooning it into a cup, then sweeping off any excess. In the bowl of your stand mixer or the bucket of your bread machine, combine the sponge ingredients. Allow the sponge to rest for 15 minutes.
  • Add the pineapple juice, butter, brown sugar, eggs and yolk, and vanilla, mixing until well combined.
  • Whisk together the remaining flour, potato flour, and salt before adding to the liquid ingredients.
  • Mix and knead until the dough is cohesive and smooth; it'll be very sticky at first. If you're using a stand mixer, beat with the flat beater for about 3 minutes at medium-high speed; then scrape the dough into the center of the bowl, switch to the dough hook, and knead for about 5 minutes at medium speed. 
  • It may have formed a very soft ball, but will probably still be sticking to the bottom of the bowl. If you're using a bread machine, simply let it go through its entire cycle. If you find the dough isn't coming together, add a tablespoon or two of flour.
  • Lightly grease the mixing bowl or a large (8-cup) measure; round the dough into a ball, and place it in the bowl or measure. Cover, and let rise until very puffy, about 1 1/2 to 2 hours. (My notes: this first rise did not take that long, probably because the dough is warm after all the beating!)  If you're using a bread machine and the dough hasn't doubled in size when the cycle is complete, simply let it rest in the machine for another 30 to 60 minutes.
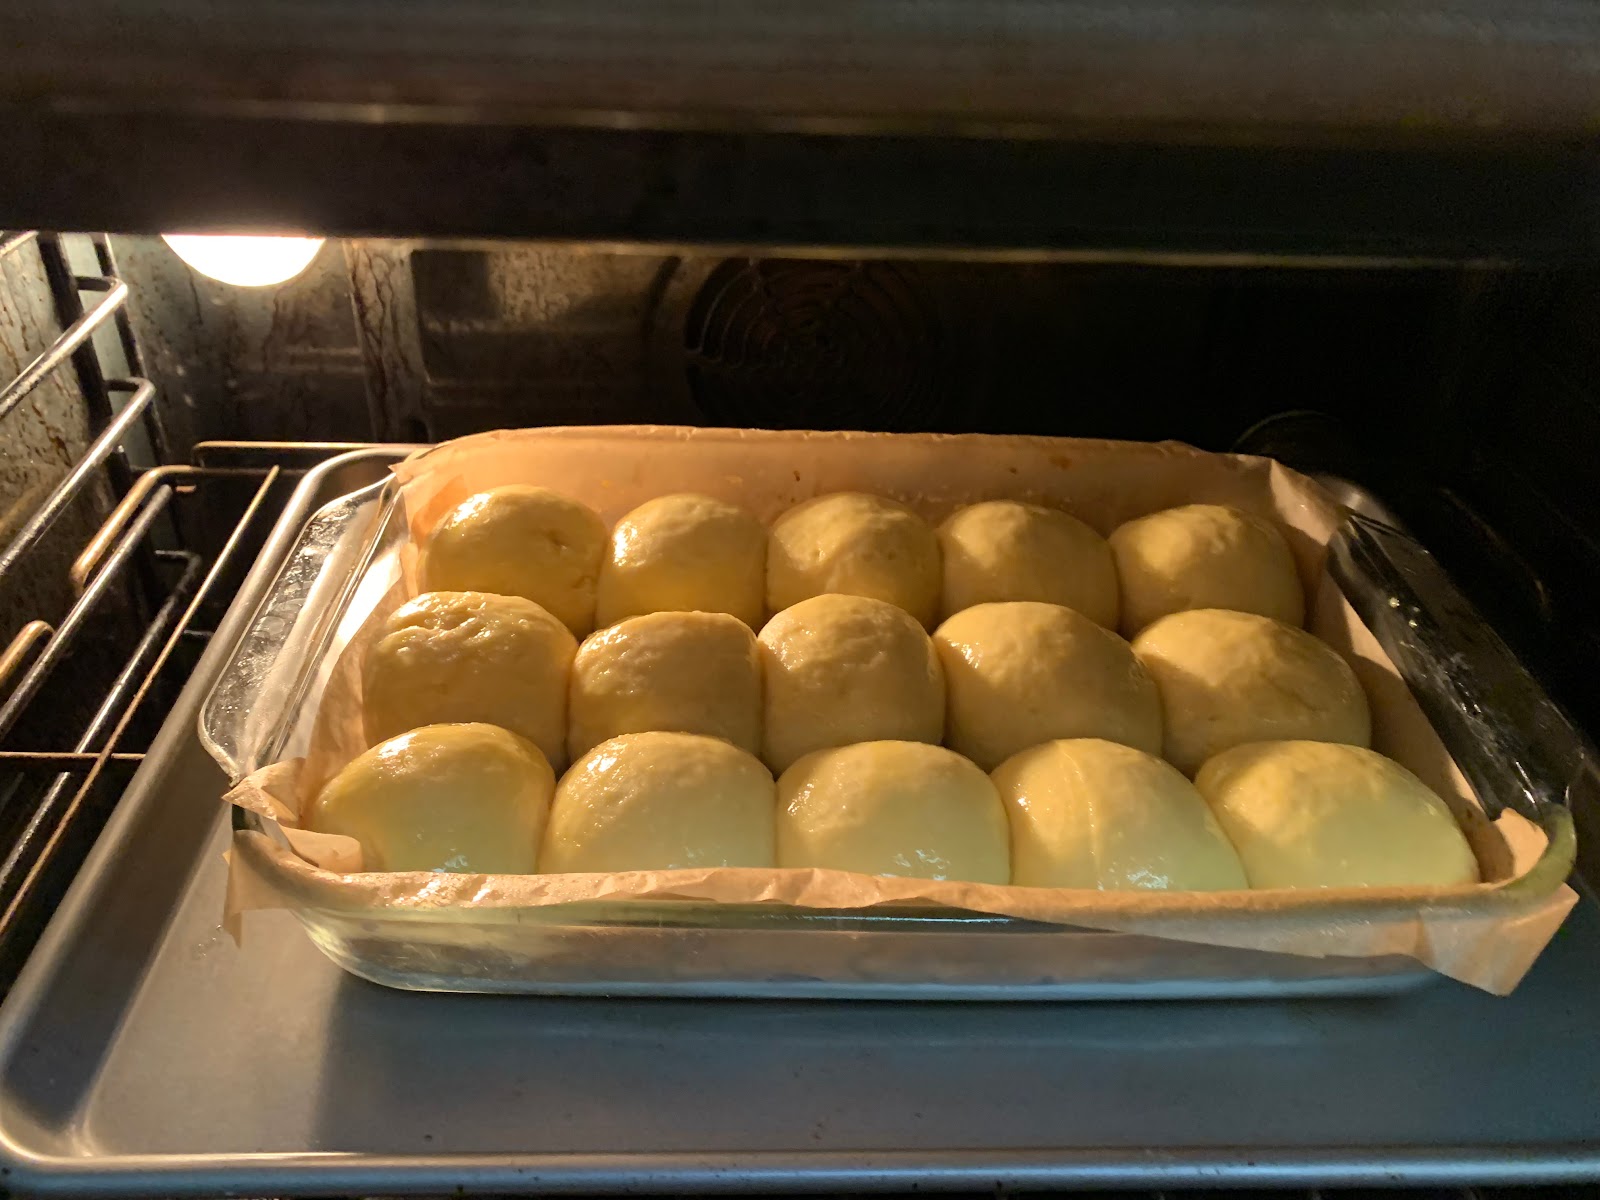
  • Gently deflate the dough. Measure the weight, divide by the number of buns you want and calculate the weight for each ball, I divided in 15, for a 3x5 matrix and each ball had around 55-57 grams. Round each piece into a smooth ball. For a second rise, space the buns in a pan covered with little flour or oil. Let it rise for 15-30 minutes.
  •  Grease a 9" x 13" pan. (mine was a glass oven safe pirex) I used parchment paper instead of grease. 
  • Once gain, gently deflate each dough ball by flattening it on an oiled plastic cutting board. Make it into a ball again and this time place it on the pirex, that will go to oven. 
  • Tent the dough gently with lightly greased plastic wrap. Let the dough rise in the pan for 1 hour, until it's nicely puffy. Toward the end of the rising time, preheat the oven to 350°F.
  • Wait for the last rise (this took almost 1 hour) see below: 


  • Mix the reserved egg white with 1 tablespoon cold water, and brush some onto the surface of the rolls; this will give them a satiny crust.


  • I have a convex oven, so I lowered the temperature to 340F and baked the rolls for 10-15 minutes and since the top color looked good, I tested the dough with a toothpick. The original recipe tell you to bake the rolls for 20 to 25 minutes, or until the internal temperature reads 190°F on a digital thermometer.
  • Remove the rolls from the oven, and after a few minutes, turn them out onto a cooling rack.
  • Serve warm. Store leftovers, well wrapped, at room temperature for several days; freeze for longer storage.
    1. Tips from King Artur Bakers

      1. This is a very wet dough, and can be tricky to handle. If you're having difficulty, we suggest lightly oiling your hands and counter before attempting to roll out the buns.
      2. Sweet breads can be agonizingly slow risers. Why? Because sugar attracts water, and when it's in bread dough, it pulls water away from yeast — leaving the yeast thirsty and unable to grow. If you're using regular yeast not formulated for sweet dough, you may find the rising time for these rolls will be longer by 30 minutes or more for each rise.
      3. If you want to use fresh pineapple juice: microwave the juice for 2 minutes until it reaches 200°F and allow to cool to lukewarm before using. The process of heating will kill any enzymes in the juice, which would otherwise destroy the gluten.
      4. To make hamburger-sized buns, prepare the dough according to the recipe instructions, and after the rise divide it into six equal pieces. Round each piece into a smooth ball, and place them into the lightly-greased wells of a hamburger bun pan, flattening them gently. Let the buns rise for an hour, until they fill the wells and are nicely puffy, then brush the rolls with the egg wash, and bake them for 20 to 25 minutes until they're a deep golden brown.

Pulled Pork ( on Hawaiian Buns )


I have followed more or less this recipe from FoodNetwork. 

However, I did not use the proper pork cut so the fibers were a little shorter than optimum. Next time I will use a big piece of meat as recommended. 

I have also used a Le Cruised pan but I think it is better to use a disposable aluminium pan like the one on the video so you can just dispose after use. 

I did not use all the pepper condiments since my family does not like spice food. 


Finally, at the end, for the sauce, after I disposed the extra fat from the pan, there was not much juice left, so I added a bottle of chicken broth to deglaze the pan, and added the barbecue sauce to it. I did use probably a little too much barbecue sauce (1 bottle) so the sauce was a little too sweet for me but my daughter really liked it like that. 

Next time I will use the proper cut of meat and see if I get more juice!

For the Hawaiian Buns recipe please check this other blog post! 


Sunday, February 13, 2022

Beef Bourguignon from Chef Jean-Pierre and Barefoot Contessa recipes

 Recipe inspired by this video and recipe posted here.

I also watched this video 


INGREDIENTS
  

  • 2 to 3 tablespoons Clarified Butter or Extra Virgin Butter Olive Oil (I have used a mix of regular butter with olive oil when needed but used the bacon fat as much as possible)
  • 8 ounces thick sliced Bacon cut into ¼ inch pieces
  • 4 pounds Beef Chuck Roast, well trimmed, cut into approx. 1 ½ inch cubes
  • 1 cup Flour sifter
  • 2 cups Onions diced or Pearl Onions  
  • 1 cup Pearl Onion, optional the chef used Aunt Nellie’s (I Have used frozen pearl onions)
  • 2 cups Mushrooms quartered - Here I suggest to use 4 cups, it does taste really good
  • 2 cups Carrots sliced into ¼ inch slices - Here again I suggest using 4 cups, they also taste great and are more healthy than potatoes
  • 2 tablespoons fresh Garlic minced
  • 1 bottle 750ML of a good Red Wine (Bordeaux, Shiraz or Burgundy) - I have used half a bottle since my family is not so much found of wine
  • 2 tablespoons fresh Thyme minced - first time I used half of the amount that I got at supermarket, but second time I used a lot since I had plenty at my vegetable garden (keep the branches all together in a corner, so you can remove them later)
  • 2 cups Beef Stock (I used 1 liter - the box you get at supermarket)
  • 2 to 3 dozen of very small Raw Potatoes, if they are big slice them in half (Small potatoes with skin are the best - red and yellow)
  • Salt and Pepper to taste
  • ¼ cup Parsley finely chopped (used maybe 1/2 cup)

INSTRUCTIONS
 

  • The Chef does in two separate pots in the video to save some time but you can do it all in one pot.  This is how….
  • In a Dutch oven, heat clarified butter or the olive oil when hot, add the bacon (you really do not need that much butter here, you can use a little bit of olive oil if you want).  Cook at low heat for a few minutes to release some of the fat from the bacon.  Remove the cooked bacon and put it aside
  • Add as many meat cubes as you can without crowding (if the skillet is too crowded, the meat won't brown properly)  Brown the meat well on all sides, remove each batch as it browns and set them aside.  
  • Add the onions and cook them until golden brown.  It may be necessary to add a little Clarified butter or Butter olive oil.
  • When all the onions are golden brown add the mushrooms, add salt on top of the mushrooms and cook until they have release most of their water.  Add the carrots, reserved beef cubes, garlic and when fragrant, add the wine, bring to boil and let reduce by half.  This could take about 3 to 5 minutes depending on your pot and your heat source.  Add the potatoes, fresh thyme and salt and pepper to taste.
  • To thicken, use the chef’s technique with the flour or if you have use a roux and thicken to your liking.  Add half of the chopped parsley, bring to boil, reduce to VERY LOW heat, cook for about 2 ½ to 3 hours or until the beef is fork tender. Here I have transfered the pot to the oven and cooked in the oven for 1:30min 2 hours. 
  • When finished, add the Cognac, the rest of the chopped parsley and adjust salt and pepper to your liking.


Thursday, December 30, 2021

Marie's Fluffy Japanese Souffle Pancakes

 Got this recipe from: https://www.justonecookbook.com/souffle-pancake/ 

Marie cooked this on Dec. 30th with very good results as you can see below: 


INGREDIENTS

  • 2 large eggs (50 g each w/o shell)
  • 1 ½ Tbsp whole milk
  • ¼ tsp pure vanilla extract
  • ¼ cup cake flour (If you're using a cup measurement, please follow this method to measure. Otherwise, the amount of flour tends to be more than you need. You can make your Homemade Cake Flour.)
  • ½ tsp baking powder
  • 2 Tbsp sugar
  • 1 Tbsp neutral-flavored oil (vegetable, rice bran, canola, etc.) (for greasing the pan)
  • 2 Tbsp water (for steaming)


Fresh Whipped Cream (optional)

  • ½ cup heavy whipping cream
  • 1 ½ Tbsp sugar (not so sweet, you can add more if you like)

Toppings

  • 1 Tbsp confectioners’ sugar/powdered sugar
  • fresh berries (strawberries, blueberries, etc)
  • maple syrupSouffle Pancakes are all about the eggs. Egg yolks and egg whites are separated, and the whites are beaten to make the meringue. Just like how you would make savory and sweet souffle or chiffon cakes.

INSTRUCTIONS
 

  • Gather all the ingredients.You will also need a 12-inch non-stick frying pan (large enough to cook 3 pancakes at the same time) with a lid.
  • Separate egg whites and egg yolks into two different bowls. Put the bowl with egg whites in the freezer for 15 minutes. Why do we freeze egg whites? Please read 3 Tips to Make Perfect Meringue (Egg Whites) in this post.
  • In the meantime, add milk and vanilla to the egg yolks and whisk until thick and frothy.
  • Sift the cake flour and baking powder into the bowl.
  • Whisk to combine thoroughly (but do not over-mix) and set aside.
  • After 15 minutes, take out the bowl with egg whites from the freezer. The egg whites should be half frozen. Now start beating egg whites.
  • When the egg whites turn frothy and pale white, gradually add in sugar (roughly ⅓ at a time). Continue to whip the egg whites.
  • The egg whites will become glossier and firmer. Stop beating when you lift up the hand mixer and the egg whites stand right up with stiff peaks slightly bending over.
  • Heat the large non-stick frying pan to 300ºF (150ºC) over the lowest heat. Brush with cooking oil and lightly remove any visible oil (otherwise the pancakes will have a spotty pattern). Keep the heat on while you combine egg whites and egg yolk mixture. 
  • Take ⅓ of egg whites and add to the egg yolk mixture. Whisk together (don’t worry too much about breaking air bubbles at this step).
  • Next, take half of the egg whites and add to the egg yolk mixture. Using a whisk, gently fold in without breaking the air bubbles in the egg whites. Why do we use a whisk instead of a silicone spatula? Please read 3 Tips to Make Perfect Meringue (Egg Whites) in this post.
  • Now transfer the egg yolk mixture into egg whites. Carefully fold in two mixtures together without breaking the air bubbles. Make sure to gently mix the batter thoroughly!
  • For my stove and frying pan, I kept 300 ºF (150 ºC) all times on low heat. Remember each pancake gets roughly 4 scoops of batter, so that’s a total of 12 scoops for 3 pancakes. Now, scoop the batter and place on the frying pan. My recommendation is to use a small ladle (or a serving spoon that’s bigger than a regular spoon - probably 2-3 Tbsp) and make a tall pancake. Next, stack one more scoop to the first pancake. Then move on to the next two pancakes giving each 2 small scoops.
  • By the time all 3 pancakes have 2 scoops, the surface of the batter is slightly dry already, so you can stack one more scoop on top, keeping it up high. In the bowl, you should still have roughly 3 scoops left (if you have slightly more, that’s okay).
  • Set timer for 6-7 minutes, add 1 Tbsp water in 3 empty spaces inside the pan and cover with the lid. Water keeps the pancake moist. Please note: the suggested time is just a guideline and it’s based on the stove and frying pan that I'm using.
  • After 2 minutes passed, open the lid, and add one more scoop for each pancake (or more scoops if you have more batter). Make sure to stack high, not wide. If the water has evaporated, add a little bit more. Cover with lid and cook.
  • After 6-7 minutes passed, using the offset spatula, lift the pancake VERY GENTLY. If you feel the pancake is stuck, don’t touch until they firm up a little. If you force it, the pancake will crack in the middle. When the pancake is ready, you can easily move the pancake.
  • Here is another set of images to show the process. Slightly pull the pancake to create an empty space and gently flip over with “rolling over” motion.
  • Add water in empty spaces and set a timer for 4 to 5 minutes to cook the other side on the lowest heat.
  • Once they are nicely browned, transfer the pancakes to your serving plates. 
  • Place fresh cream on the pancakes and top with berries. Dust the pancake with confectioners’ sugar and drizzle with maple syrup. Enjoy!

The egg whites are beaten until stiff peaks form and then are folded gently and carefully into the rest of the batter. The souffle pancakes are extra fluffy because the air bubbles hold their shape inside the pancake batter.

As a result, the pancakes are super airy, like souffle. When you cut the pancakes, you can even hear the sound of air bubbles escaping!

Enjoy these souffle pancakes the same way you do with standard flapjacks, with fresh whipped cream, some fruits, syrups, and toppings like chocolate chips and nuts.


1. Beat the egg whites (meringue) correctly.

To be honest, making meringue requires a lot of practice. Some trials and errors are just part of the process, but I promise it does get easy once you have more experience and understand what it takes to reach the right consistency.


We’re looking for stiff peak, where you lift up your whisk and the egg whites go straight up firmly, but the tip of egg whites bend over like a taking a bow. If you over-beat egg whites, they will break into pieces. If you under-beat, egg whites don’t have enough air bubbles and the pancakes won’t be fluffy.


2. Preheat the pan on the lowest setting for a longer time.

Even heating on the frying pan is crucial for the pancakes to cook through all at once. You want to preheat the pan at the lowest heat to help prevent hot spots (meaning some part of the pan is low heat, some part is too hot). This way you have full control over the cooking time and the final result.


3. Pile up the batter vertically (high).

The key to make lofty pancakes is to add a new pile over the batter on the pan after it starts to form.


4. Cook slow, covered with a lid, on low heat.

Unlike regular pancakes, you will need to cook these thick & fluffy Japanese pancakes for a much longer time. If you use higher heat, the pancakes may look done, but the inside will be too raw. Therefore, steady slow cooking over low heat is necessary. To lock in the heat and moisture inside the pan, cover with a lid.


5. Add water to create a little bit of steam.

I’ve tried without adding water before and the difference can be subtle. But since it doesn’t take much to add water, I include this step in my recipe. Just drop 1 tablespoon of water to empty spaces in the frying pan to add moisture in the pan.

Farofa Brasileira (de farinha de Mandioca ou Milho ou meio a meio)

Farofa Brasileira (instead of farinha de milho uso farinha de mandioca)

- INGREDIENTES:


- 100 GRAMAS DE BACON PICADO EM CUBOS

- 1/2 CEBOLA PICADA EM CUBOS

- 4 DENTES DE ALHO PICADOS

- 2 COLHERES DE SOPA DE PIMENTÃO VERMELHO PICADO (se quiser)

- 2 COLHERES DE SOPA DE PIMENTÃO AMARELO PICADO (se quiser)

- 1 COLHER DE SOPA DE MANTEIGA

- 200 GRAMAS DE FARINHA DE MILHO FLOCADA

- SAL Á GOSTO

- PIMENTA DO REINO Á GOSTO

- 1 TOMATE PICADO SEM SEMENTES

- 1/2 XÍCARA DE CHÁ DE AZEITONAS PICADAS

- 1 LATA DE MILHO E ERVILHA

- 1/2 XÍCARA DE CHÁ DE UVAS PASSAS PRETAS

- 1/2 CENOURA RALADA

- CHEIRO VERDE PICADO Á GOSTO

- 100 GRAMAS DE NOZES PICADAS


Friday, December 24, 2021

Jacques Pepin's inspired "Christmas Ham" with Peach/Fruit Preserves and Basil Sauce (served with Brazilian Yuka Root Farofa and Japanese Garlic Rice)


This Original Recipe uses fresh peaches that are not easily found during Christmas season in USA, that is why I have replaced the fresh peaches for fresh pears and added preserved/dried peaches, pears, apples and apricots. 

I got the recipe from the book Jacques Pepin Celebrates but I recently found it online here: https://www.tfrecipes.com/jacques-pepin-baked-ham/ 

Time to prepare:

  • 3 hours for ham in sous vide at 170-180F (or in pre-boiling water)  
  • 30 min in oven at 350F
  • 1 hour at 325F
  • 30 min in oven after sprinkling sugar on top and decorating with rings of canned pineapples and plum in the middle 


Ingredients: 

- 1 fully cooked ham, 12-16 pounds. I use the spiraled ham or any other ham

Peach Mustard Glaze:

  • 1/2 cup peach preserves
  • 1 tsp freshly ground black pepper
  • 2 tbsp dried mostard
  • 1 tbsp balsamic vinegar
  • 1/2 tsp ground allpice
  • 2 tbsp confectioner's sugar
  • 1 cup of water, for deglazing drippings from baked ham
  • 3 cups demi-glace (Brown stock or meat bouillon )  
Peach sauce: 
  • (Note: Recently I have been replacing the fresh fruit by dried peachs (and or nectaries) and pears
  • 4 tbsp unsalted butter
  • 3 pounds large ripe peaches (around 10), each pitted (but not peeled), cut in 8 wedges
  • 1/3 cup of sugar    
  • 4 ounces of dried peaches, cut into 1/2 inch slices
  • 3 tablespoons cider vinegar
  • 4 cups combined demi-glace and deglazed ham drippings (or no drippings depening on time) 
  • Some of the canned pineapple and or peach juice
  • 1 tsp salt
  • 1 tsp potato starch dissolved in 1 tbsp water (for thickening)
  • 1 cup of julienne basil leaves
Ham Cooking
  • Put the ham on a stock pot and fill with cold water, bring to 170 to 180F (below the boil point; if boiled ham will crack) Cook for 3 hours  (I did a suis vide using the same packaging as the ham had before). Let it cool in cooking water.
  • Remove ham from water, remove skin from ham (if any) and trim the surface of meat where it is brown and skin like around the shank bone. When skin has been removed, trim off all but a thin layer of white fat from the surface of the ham. 
  • Run a point knife in a crisscross pattern on the fat on top of the ham, this will help the glaze to adhere to meat
For the peach mustard-glaze
  • Mix preserves, pepper, mustard, balsamic vinegar and allspice. Spread this on top of the ham, place in roasting pan, and bake at 350-degree for 30 mins. Reduce heat to 325F and continue cooking for 1 hour. Sprinkle the sugar and cook for another 30 min until glazed
  • Transfer the ham to a platter and set it up on a warm place while you make the peach sauce. Discard the accumulated fat on roasting pan and add 1 cup of water to the drippings in the pan, stirring to loosen and mix the solidified juices. Add the demi-glace and bring to boil. RESERVE FOR PEACH sauce
Peach Sauce
  • Heat the butter in large skillet 4 tbsp of butter, when hot add peach wedges to each skillet, saute for 2-3 mins. Sprinkle sugar and cook 3-4 min longer. Add dried peach juliene and the apple cider vinegar, stir to mix. Strain the reserved demi-glace over the peaches, stil in the salt. If sauce is thinner than you would like add the potato starch and bring to a boil. At serving time stil in the basil julienne. 

Tuesday, August 31, 2021

Arroz de Coco e Moqueca de Peixe da Dada' da Bahia

 Receita de Aldaci dos Santos ou Dadá... - Veja mais aqui 


ARROZ DE COCO 

Ingredientes 

  • 500 gramas de arroz 
  • 1,5 litro de leite de coco 
  • 200 gramas de coco ralado 
  • 2 colheres de sopa de açúcar 
  • 1 colher de chá de sal 

Modo de preparo Coloque todos os ingredientes numa panela e leve ao fogo médio. Quando o leite de coco estiver quase secando, desligue o fogo, tampe a panela e deixe descansar. Imagem: Cacio Murilo de Vasconcelos/Getty Images/iStockphoto 


MOQUECA DE PEIXE 

Ingredientes 

  • 2 dentes de alho 
  • 2 colher de sopa de sal 
  • 1 xícara de cha de coentro picado 
  • Suco de 2 limões 
  • 4 colheres de sopa de azeite de oliva 
  • 2 quilos de peixe vermelho em postas 
  • 1 litro de água 
  • 4 tomates 
  • 2 cebolas 
  • 1 pimentão de sua preferência ou 150 gramas de cada (vermelh... 
  • 1 xícara de chá de cebolinha 
  • 2 colheres de chá de salsa 
  • 1,5 litro de leite de coco 
  • 3 colheres de sopa de coco ralado 
  • 2 colheres de sopa de azeite de dendê 

Modo de preparo No pilão, macere o alho, uma colher de sopa de sal e duas colheres de sopa do coentro até fazer uma pastinha. Junte o suco de um limão e uma colher de sopa de azeite de oliva. Misture e reserve. Coloque o peixe para marinar numa tigela com o suco do outro limão, a água e resto de sal. Se estiver calor, pode juntar pedras de gelo. Enquanto isso, corte a cebola em rodelas finas, pique a cebolinha e a salsa e corte o tomate e os pimentões em tirinhas. Reserve. 

Escorra a água do peixe e lave as postas rapidamente em água. Depois, tempere uma a uma com com a mistura do pilão e reserve. Numa tigela, misture a cebola, o tomate, os pimentões, a cebolinha e o restante do coentro. Divida em três partes. Use a primeira parte para forrar o fundo de uma panela grossa fora do fogo. Por cima, acomode o peixe temperado. Cubra com a segunda leva de temperos, regue com três colheres de sopa de azeite de oliva. Junte o leite de coco, o coco ralado e leve ao fogo. Deixe cozinhar por vinte minutos com a panela tampada ou até que o peixe fique no ponto. Por fim, coloque a decoração que desejar (coentro e legumes são boas opções) e o azeite de dendê. Retire do fogo e sirva com arroz..

Ret... - Veja mais em https://www.uol.com.br/nossa/noticias/redacao/2021/08/31/arroz-de-coco-e-moqueca-dada-querida-quituteira-baiana-ensina-a-fazer.htm?cmpid=copiaecola