Friday, December 30, 2022

Marie's Baked Potato

 From: https://www.gimmesomeoven.com/baked-potato/


Video: https://www.gimmesomeoven.com/baked-potato/ 

HOW TO BAKE A POTATO:

  1. Heat oven to 450°F. Yep, you read the temperature right. The oven needs to be extra hot, so that the potato skins will crisp up quickly.
  2. Prepare your baking sheet.  If you happen to own a wire cooling rack, I highly recommend placing one on top of a baking sheet, so that the potatoes can cook evenly on all sides. Or if you don’t own a wire rack, you can either place the potatoes directly on the oven racks (with a baking sheet below, to catch any drips) or you can just bake the potatoes on a foil-lined (or parchment-lined, at your own risk) baking sheet.
  3. Poke your potato all over with a fork.  Because no one wants to deal with exploding potatoes. ;)
  4. First bake. My best advice for how long to bake a potato — in two rounds! For the first round, bake for about 25 minutes, until the skin starts to feel dry and slightly wrinkly.
  5. Brush the potato with melted butter (or oil). Next, carefully remove the potato from the oven. Use a pastry brush to brush the potato with melted butter (or oil) evenly on all sides. Sprinkle the potato with a generous pinch of Kosher salt. (I like mine fairly coarse so that you get a bit of a crunch.)  Then place the potato back on the baking sheet, opposite side up, so that the potato can cook evenly on both sides.
  6. Second bake. Bake for an additional 20 minutes. Then very carefully, use an oven mitt to squeeze the potato (it will be hot) to check for doneness. If the insides are nice and soft and give under pressure, remove the potato from the oven. Otherwise, continue cooking in 5-minute increments until the potato is ready to go. Cooking time will vary depending on the size of the potatoes, but on average, they typically take 45-55 minutes to cook.
  7. Cut, squeeze, fluff, season and serve! Finally, slice the potato open lengthwise with a paring knife, give it a good squeeze to open it up, fluff the insides with a fork, add your favorite seasonings or toppings. Then a perfectly crispy-on-the-outside, soft-and-fluffy-on-the-inside, and oh-so-delicious baked potato will now be yours to enjoy!

Tuesday, October 4, 2022

Melanzane a la Parmigiana - Parmigiana di melanzane - Eggplant Parmesan

 The best recipes I have seen are below on YouTube, I have modified to avoid using flour and deep frying. 


https://youtu.be/Is1tfdLUyrU 


Try cutting it longitudinal next time! Salt and make a pile like this video. 

The ingredients of the eggplant parmigiana (For about 8-10 servings)

  • 2 Kg. Of eggplants.
  • 700-800 gr. of tomato sauce.
  • 300 gr. of mozzarella.
  • 100 gr. of grated Parmesan cheese.
  • 4-5 tablespoons of flour.
  • q.s. of salt and pepper.
  • q.s. of oil for frying.

The preparation of the eggplant parmigiana

1) Prepare the eggplants then wash and slice them to a thickness of about 7-8 mm. (longitudinal or transversal cuts, as you preffer) If desired, we can also remove part of the peel.

2) Once sliced, we place them in a colander and salt them slightly so as to remove the water from the vegetation, which is bitter and dark. We continue like this in layers, until all the eggplants are used up.

3) Once the layers are finished, cover with a plate and place a weight on top, so as to drain the water well.

4) Leave the eggplants slices in salt for about 30 minutes and in the meantime we can prepare the rest of the ingredients: If we do not already have it ready we prepare the tomato sauce, (I use San Marzano tomato can, onion, garlic and 

5) Cut the mozzarella into cubes.

6) Once the aubergines have eliminated the vegetation water, we remove them from the salt and dry them on a cloth or with absorbent paper.

7) Once the aubergines have dried, heat the oil well. We can use olive oil or even seed oil such as sunflower oil or peanut oil. First, lightly flour them so that they do not absorb too much oil during cooking. The important thing is that frying takes place in abundant oil and that it is hot, at a temperature of about 190 °.

8) During cooking, turn them several times in order to brown them on both sides.

9) Once ready, we drain them first in a colander so that they lose excess oil, and then we transfer them to absorbent paper to allow them to dry completely.

10) At this point we have everything ready, and we can assemble our parmigiana. We sprinkle the bottom of a baking dish with a little tomato sauce, and begin to make the layers. So first the aubergine slices which we then cover with the tomato sauce, and then the mozzarella. (If the mozzarella contains too much water it is best to drain it on a colander first). Finally add a few leaves of chopped basil and some Parmesan.

11) We continue in the same way until 3-4 layers are made. Made 3 layers, we finish the last layer that we will cover with only tomato sauce and Parmesan, this to prevent the mozzarella from burning during cooking.

12) Clean the pan and place in the oven at a temperature of about 180 ° (356 F) and cook for about 25-30 minutes.

Wednesday, May 11, 2022

TWO - Chocolate Chip Cookies for One

 I got this recipe from American Test Kitchen


Chocolate Chip Cookies for One

A pinch is equal to 1/16 teaspoon. You can use a regular rimmed baking sheet if you don’t have a quarter-sheet pan, though you’ll have to use your oven.

  • 3 tablespoons all-purpose flour
  • Pinch baking soda
  • Pinch table salt
  • 1 tablespoon unsalted butter, softened
  • 2 tablespoons packed brown sugar
  • 1 large egg yolk
  • ⅛ teaspoon vanilla extract
  • 2 tablespoons chocolate chips


1. Adjust toaster oven or oven rack to middle position and heat oven to 325 degrees. Line small rimmed baking sheet with parchment paper. Whisk flour, baking soda, and salt together in bowl. Using rubber spatula, mash butter and sugar together in separate bowl until well combined and lightened in color. Add egg yolk and vanilla and mix until combined. Stir in flour mixture until just combined then stir in chocolate chips.

2. Divide dough into 2 portions, then roll into balls. Place on prepared sheet, spaced about 2 inches apart. Bake until edges of cookies are set and beginning to brown but centers are still soft and puffy, 8 to 12 minutes. Let cookies cool on sheet for 10 minutes. Serve.

Wednesday, March 2, 2022

Lamb Chops with Potatos

Inspired by this recipe from izzycooking.com!

Lately I have been cooking lamb more and more often. The reason is that my wife did not like lamb! Yes, you read it right, she DID NOT like lamb but now she does. She does like properly cooked lamb, from restaurants like Dishdash in Sunnyvale California but did not believe it was possible to prepare that level of quality lamb at home. Well, now she does like the lamb that I cook at home and below I will tell you my secret!

Sous Vide + proper seasoning. 

Using the sous vide process, I have prepared a rack of lamb (1 hour at 131 F) and more recently Lamb Chops with excellent results. Below is the recipe for my last cooking session: 

Lamb Chops with Potatoes


Ingredients/process: 

  • For the lamb and sous vide pack: 
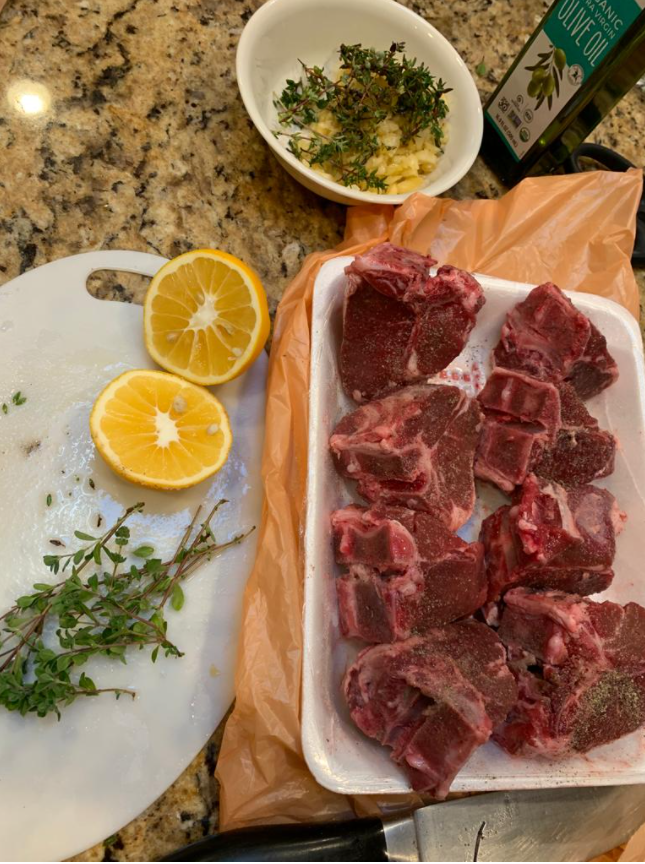
    • 2-3 lbs of lamb chops (about 8-10 lamb chops, 1.5 inches cuts)
    • 8-12 garlic  cloves (at least one large head) cut in small pieces (1/4 in cubes)
    • Fresh Thyme (5-10 small brunches) and marjoram if available
    • 1/3 cup olive oil 
    • Salt (lightly sprinkled on meat)
    • Black pepper (same)
    • lemon juice from one big lemon
    • Process:
      • Season meat with salt and pepper and pack into a ziplog bag
      • Add the minced garlic surrounding the meat, do the same with the herbs
      • Mix lemon juice with olive oil and pour the content around and over the meat.
      • Cook meat in the sous vide bath for 2-4 hours at 134 F for median (or 130 F for rare). Mine was cooked for 2 hours at 135 F. You can find temperature charts for sous vide by googling it. I recommend the 2 hours to make the meat more soft. A rack of lamb would not need 2 hours. You can find temperature chart here..
      • Cook the potatoes following instructions below so they get ready almost at same time as the sous vide, you will need the sous vide pack to finalize the potatoes
      • Cook the meat in a hot pan (next time I will also try to use a torch, my new toy), start from the bone part of the chop, then the other 2 faces of the "triangle, with special attention to cook the side that has a white cover really well, and then finalize the 2 surfaces, set it aside to rest. 
      • You will now make the glaze
  • For the potatoes:
    • Use small potatoes (3-4 per person) 
    • carrots (1 per perso) in pieces
    • Garlic cloves 5-8
    • Bay leaves 3-4
    • Black pepper corns
    • Salt (at taste)
    • Process: 
      • Wash the potatoes but keep skin
      • Remove skin from carrots and cute into 3 inches pieces
      • Boil all the ingredients together until soft (a fork can be inserted on potatoes and carrots)
      • Remove the veggies and save the soup to make a meat glaze 
      • Wait to finalize the potatoes until you have removed the meat from the sous vide packs
      • Brown the garlic from sous vide pack and potato soup in butter, add the thyme and the potatoes and carrots to the same pan, add salt and pepper to taste
      • Set aside to serve with the meat
  • For the Meat Glaze:
    • 1 cup of white wine
    • Liquid from sous vide pack
    • Soup liquid used to boil the vegetables
    • Process:
      • Pass the liquid from sous vide pack though a strainer to separate the garlic and herbs from liquid
      • Boil the liquid from sous vide and remove and protein chunks that may form on top
      • After you cook the meat, on the same pan, deglaze the pan with the a little bit of the vegetable soup. Pass that on a strainer to remove any burning pieces and clean the pan
      • return the liquid to the pan, now you are going to add more vegetable soup and a more from the liquid from sous vide to create your glaze, meeting your taste
      • You can than thicken that sauce with flour or corn starch and butter
      • You can split the sauce in 2 and add wine to half of it (my daughter does not like the wine extra taste
    • Some sites that talk about sauces: One for a steak pan sauce here, Chimichurri sauce, multiple ideas for lamb sauce here, and another Chimichurri here . Multiple ideas for using Sous Vide Juices here too and another one
Variation from Oct2023: Mint marinate:
Ingredients
  • 2 tablespoon lemon juice
  • 2 tablespoon olive oil
  • 3 cloves garlic, minced
  • 1/4 onion
  • ¼ cup snipped (10-12 leaves)  mint
  • ¼ teaspoon pepper
  • ¼ teaspoon salt 


Sunday, February 27, 2022

Hawaiian Buns - 3 rises recipe

 I have used this recipe from KingArthurBaking.com I have used the blog posted on that site that has more detailed instructions but for the forming and rise I have followed this YouTube video and I got very good results. The Buns were really good and raised well. You need a lot of patience to let the dough rise properly since all the sweetness slow the rise. You can see the results were amazing though. 

I did rise the dough 3 times and followed some of the directions from this video from Savor Easy youtube channel. I did not use that recipe though do I can not tell you what happens if you do follow the same recipe, sorry. 

I made 2 batches, the first one I have replaced the Potato Flour by regular flour and used only unbleached sugar but no brown sugar. The results were quite good. For the second batch I have used brown sugar (1/3 of the total sugar amount) and used a mashed potato mix to in place of the potato flour. The results were even better, I assume because of the potato flour.   

Next time I want to try, other type of rolls like this Hokkaido Milk Bun or this Hawaiian Bun recipe using a technic called yu-dane (Japanese: 湯種, romanized: yu-dane) like here on this Shokupan recipe from ChopSticksChronicles site. (Thank you Shikoko-san!) The technic was used to create a similar technic called tangzhong (Chinese: 湯種; pinyin: tāngzhǒng) or Tangzhong Method (also called water roux, tang zhong or just tangzhong) I just want to try and see if it makes a big difference. 

First Batch:

Second Batch: 


Ingredients (for 15 buns of around 55grams each)

Sponge

Dough

Instructions

  • For the sponge: Weigh your flour; or measure it by gently spooning it into a cup, then sweeping off any excess. In the bowl of your stand mixer or the bucket of your bread machine, combine the sponge ingredients. Allow the sponge to rest for 15 minutes.
  • Add the pineapple juice, butter, brown sugar, eggs and yolk, and vanilla, mixing until well combined.
  • Whisk together the remaining flour, potato flour, and salt before adding to the liquid ingredients.
  • Mix and knead until the dough is cohesive and smooth; it'll be very sticky at first. If you're using a stand mixer, beat with the flat beater for about 3 minutes at medium-high speed; then scrape the dough into the center of the bowl, switch to the dough hook, and knead for about 5 minutes at medium speed. 
  • It may have formed a very soft ball, but will probably still be sticking to the bottom of the bowl. If you're using a bread machine, simply let it go through its entire cycle. If you find the dough isn't coming together, add a tablespoon or two of flour.
  • Lightly grease the mixing bowl or a large (8-cup) measure; round the dough into a ball, and place it in the bowl or measure. Cover, and let rise until very puffy, about 1 1/2 to 2 hours. (My notes: this first rise did not take that long, probably because the dough is warm after all the beating!)  If you're using a bread machine and the dough hasn't doubled in size when the cycle is complete, simply let it rest in the machine for another 30 to 60 minutes.
  • Gently deflate the dough. Measure the weight, divide by the number of buns you want and calculate the weight for each ball, I divided in 15, for a 3x5 matrix and each ball had around 55-57 grams. Round each piece into a smooth ball. For a second rise, space the buns in a pan covered with little flour or oil. Let it rise for 15-30 minutes.
  •  Grease a 9" x 13" pan. (mine was a glass oven safe pirex) I used parchment paper instead of grease. 
  • Once gain, gently deflate each dough ball by flattening it on an oiled plastic cutting board. Make it into a ball again and this time place it on the pirex, that will go to oven. 
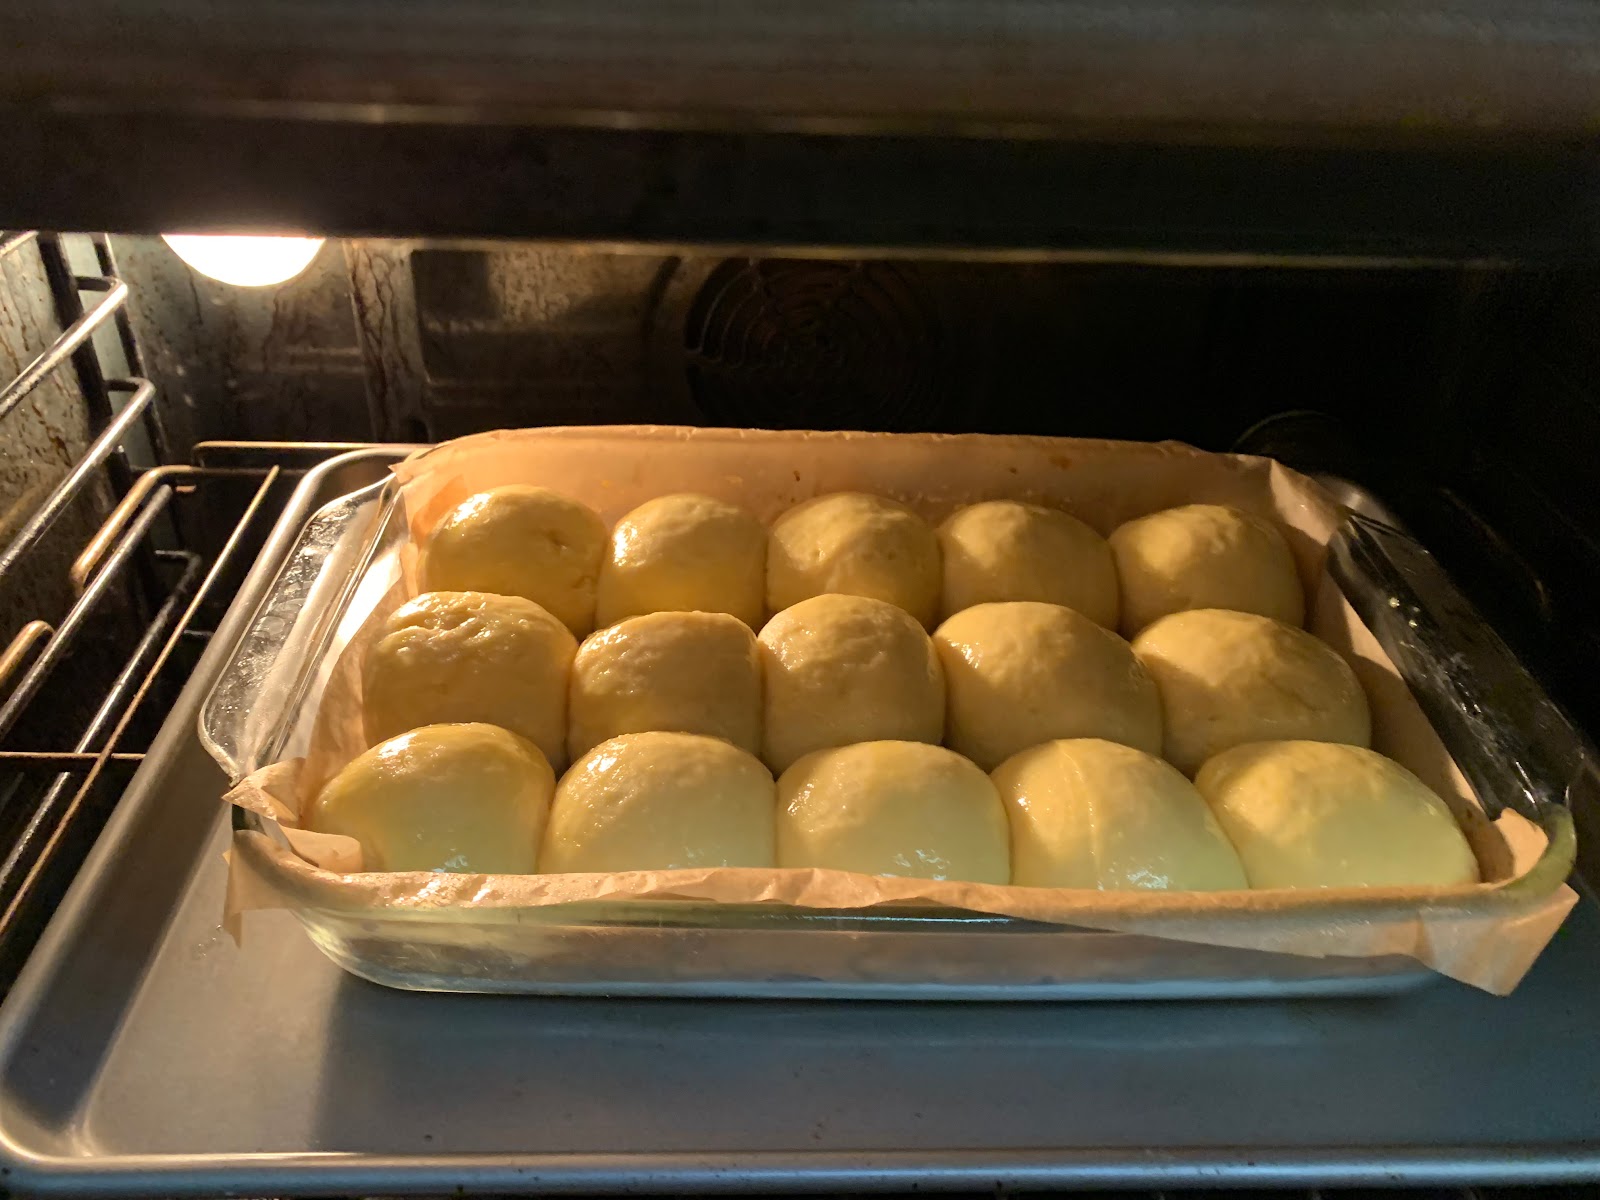
  • Tent the dough gently with lightly greased plastic wrap. Let the dough rise in the pan for 1 hour, until it's nicely puffy. Toward the end of the rising time, preheat the oven to 350°F.
  • Wait for the last rise (this took almost 1 hour) see below: 


  • Mix the reserved egg white with 1 tablespoon cold water, and brush some onto the surface of the rolls; this will give them a satiny crust.


  • I have a convex oven, so I lowered the temperature to 340F and baked the rolls for 10-15 minutes and since the top color looked good, I tested the dough with a toothpick. The original recipe tell you to bake the rolls for 20 to 25 minutes, or until the internal temperature reads 190°F on a digital thermometer.
  • Remove the rolls from the oven, and after a few minutes, turn them out onto a cooling rack.
  • Serve warm. Store leftovers, well wrapped, at room temperature for several days; freeze for longer storage.
    1. Tips from King Artur Bakers

      1. This is a very wet dough, and can be tricky to handle. If you're having difficulty, we suggest lightly oiling your hands and counter before attempting to roll out the buns.
      2. Sweet breads can be agonizingly slow risers. Why? Because sugar attracts water, and when it's in bread dough, it pulls water away from yeast — leaving the yeast thirsty and unable to grow. If you're using regular yeast not formulated for sweet dough, you may find the rising time for these rolls will be longer by 30 minutes or more for each rise.
      3. If you want to use fresh pineapple juice: microwave the juice for 2 minutes until it reaches 200°F and allow to cool to lukewarm before using. The process of heating will kill any enzymes in the juice, which would otherwise destroy the gluten.
      4. To make hamburger-sized buns, prepare the dough according to the recipe instructions, and after the rise divide it into six equal pieces. Round each piece into a smooth ball, and place them into the lightly-greased wells of a hamburger bun pan, flattening them gently. Let the buns rise for an hour, until they fill the wells and are nicely puffy, then brush the rolls with the egg wash, and bake them for 20 to 25 minutes until they're a deep golden brown.

Pulled Pork ( on Hawaiian Buns )


I have followed more or less this recipe from FoodNetwork. 

However, I did not use the proper pork cut so the fibers were a little shorter than optimum. Next time I will use a big piece of meat as recommended. 

I have also used a Le Cruised pan but I think it is better to use a disposable aluminium pan like the one on the video so you can just dispose after use. 

I did not use all the pepper condiments since my family does not like spice food. 


Finally, at the end, for the sauce, after I disposed the extra fat from the pan, there was not much juice left, so I added a bottle of chicken broth to deglaze the pan, and added the barbecue sauce to it. I did use probably a little too much barbecue sauce (1 bottle) so the sauce was a little too sweet for me but my daughter really liked it like that. 

Next time I will use the proper cut of meat and see if I get more juice!

For the Hawaiian Buns recipe please check this other blog post! 


Sunday, February 13, 2022

Beef Bourguignon from Chef Jean-Pierre and Barefoot Contessa recipes

 Recipe inspired by this video and recipe posted here.

I also watched this video 


INGREDIENTS
  

  • 2 to 3 tablespoons Clarified Butter or Extra Virgin Butter Olive Oil (I have used a mix of regular butter with olive oil when needed but used the bacon fat as much as possible)
  • 8 ounces thick sliced Bacon cut into ¼ inch pieces
  • 4 pounds Beef Chuck Roast, well trimmed, cut into approx. 1 ½ inch cubes
  • 1 cup Flour sifter
  • 2 cups Onions diced or Pearl Onions  
  • 1 cup Pearl Onion, optional the chef used Aunt Nellie’s (I Have used frozen pearl onions)
  • 2 cups Mushrooms quartered - Here I suggest to use 4 cups, it does taste really good
  • 2 cups Carrots sliced into ¼ inch slices - Here again I suggest using 4 cups, they also taste great and are more healthy than potatoes
  • 2 tablespoons fresh Garlic minced
  • 1 bottle 750ML of a good Red Wine (Bordeaux, Shiraz or Burgundy) - I have used half a bottle since my family is not so much found of wine
  • 2 tablespoons fresh Thyme minced - first time I used half of the amount that I got at supermarket, but second time I used a lot since I had plenty at my vegetable garden (keep the branches all together in a corner, so you can remove them later)
  • 2 cups Beef Stock (I used 1 liter - the box you get at supermarket)
  • 2 to 3 dozen of very small Raw Potatoes, if they are big slice them in half (Small potatoes with skin are the best - red and yellow)
  • Salt and Pepper to taste
  • ¼ cup Parsley finely chopped (used maybe 1/2 cup)

INSTRUCTIONS
 

  • The Chef does in two separate pots in the video to save some time but you can do it all in one pot.  This is how….
  • In a Dutch oven, heat clarified butter or the olive oil when hot, add the bacon (you really do not need that much butter here, you can use a little bit of olive oil if you want).  Cook at low heat for a few minutes to release some of the fat from the bacon.  Remove the cooked bacon and put it aside
  • Add as many meat cubes as you can without crowding (if the skillet is too crowded, the meat won't brown properly)  Brown the meat well on all sides, remove each batch as it browns and set them aside.  
  • Add the onions and cook them until golden brown.  It may be necessary to add a little Clarified butter or Butter olive oil.
  • When all the onions are golden brown add the mushrooms, add salt on top of the mushrooms and cook until they have release most of their water.  Add the carrots, reserved beef cubes, garlic and when fragrant, add the wine, bring to boil and let reduce by half.  This could take about 3 to 5 minutes depending on your pot and your heat source.  Add the potatoes, fresh thyme and salt and pepper to taste.
  • To thicken, use the chef’s technique with the flour or if you have use a roux and thicken to your liking.  Add half of the chopped parsley, bring to boil, reduce to VERY LOW heat, cook for about 2 ½ to 3 hours or until the beef is fork tender. Here I have transfered the pot to the oven and cooked in the oven for 1:30min 2 hours. 
  • When finished, add the Cognac, the rest of the chopped parsley and adjust salt and pepper to your liking.